Note: My Hackintosh days are over. I use an M1 Mac mini now.
ThinkPad T530 is undoubtedly a solid machine that can handle macOS Catalina. I installed Mojave on this machine a while ago but never used T530 as a daily driver. Skip the introduction if you like.
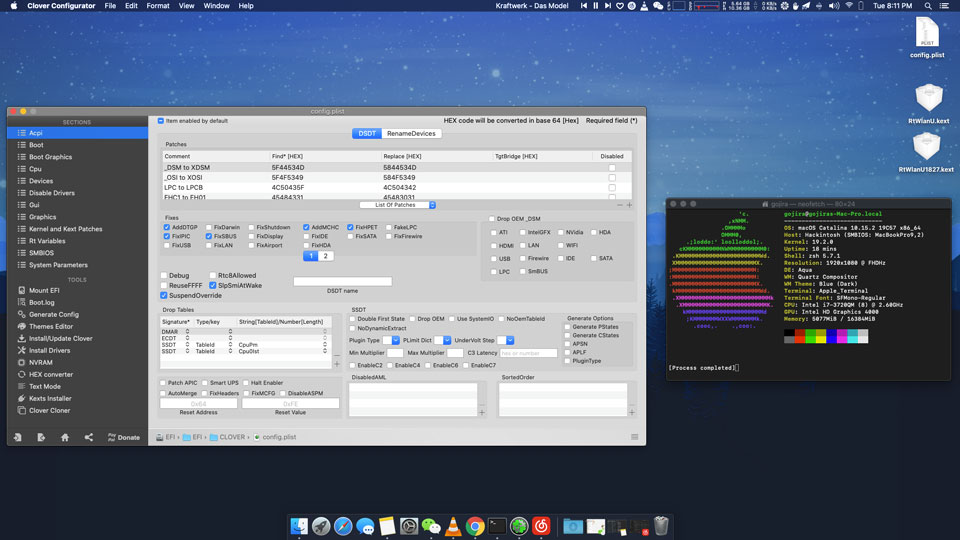
But here we are! The hacking part was quite easy this time. A few Kext updates and Clover updates did the job. I haven’t edited the config.plist from the Mojave installation either. Luckily, Apple didn’t throw any kernel panic while testing. I did a Vanilla install, by the way.
Alright, let’s dive in! Read the guide carefully if you’re a beginner. Don’t blame me if you f*ck up your current OS.
Don’t forget to fork or star my GitHub repo while you’re at it. Please don’t sell the EFI or use it on your YouTube video without crediting the original author. Don’t be an A-hole.
My ThinkPad T530′ Specs: i7 3740QM, 16GB Memory, 128GB SSD + 256GB SSD + 750GB HDD, NVIDIA NVS 5400M (N/A for Hackintosh)
What Doesn’t Work?
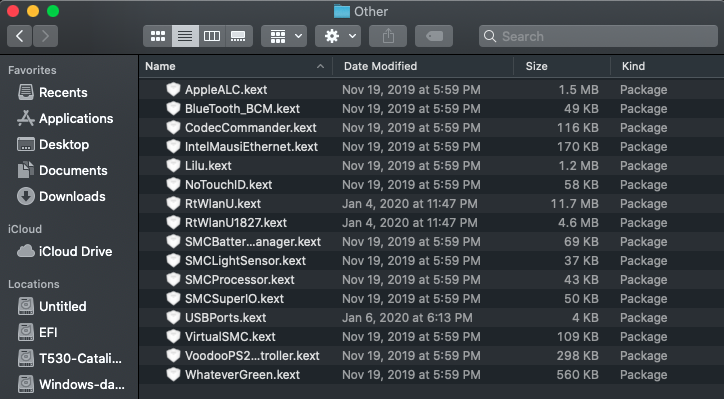
- Inbuilt WiFi card.
- Mini DisplayPort.
- Fingerprint reader (if you’ve one).
- Card reader.
#README
- Proceed with caution.
- Tested on macOS Catalina 10.15.2.
- The EFI folder is not for the Opencore bootloader.
- Do a Vanilla install if possible. I haven’t tested a direct update from Mojave.
- The EFI folder also applies to SSD hot-swap, i.e., if you plan to swap SSD from a MacBook Pro running macOS 10.15.2 to a ThinkPad 530.
Download The EFI folder for ThinkPad T530
Recommended BIOS settings
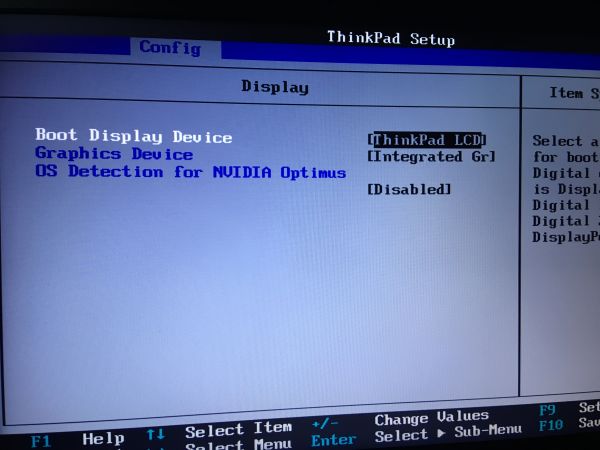
Disable dGPU: The process is quite simple. Go to BIOS Setup -> Config -> Display and set the Graphics Device as “Integrated Graphics.” Also, disable the OS Detection for NVIDIA Optimus. Make sure it looks like the attached image below. Then, select Save & Exit.
Select UEFI Only: Go to BIOS Settings → Startup, and select UEFI only.
Disable CSM Support: Do this if the USB doesn’t boot initially. Go to BIOS Settings → Startup, disable CSM support.
ThinkPad T530 macOS Catalina – Vanilla Installation Guide(s)
It doesn’t matter if you own a real Mac or not. I’ll share the installation guide for both macOS and Windows.
How to create a bootable macOS Catalina 10.15 USB install drive? (on macOS)
Step 1: Refer to this guide from 9to5mac.
Step 2: Download and install Clover to USB. Refer to this article for clarity.
Step 3: Install Clover Configurator, and mount the EFI partition. Then, replace the EFI folder with the one on my repo.
How to create a bootable macOS Catalina 10.15 USB install drive? (on Windows)
Step 1: Install Transmac on a Windows machine. It has a 15-day trial period and works flawlessly, flashing DMG files to USB.
Step 2: Download the macOS 10.15.2 with the clover dmg file from here or other sources you come across Google SERP.
Step 3: Download the EFI folder in my GitHub repo.
Step 4: Download Clover Configurator for macOS (latest version).
Step 5: Connect a 16 GB USB flash drive.
Step 6: Open Transmac. In the left pane, right-click the USB Drive and select Format Disk for Mac.
Again, right-click the USB Drive in the left pane and select Restore with Disk Image. Then select the DMG file I mentioned in (2). The flashing process will take a few minutes, depending on the size of .dmg and speed/port of the USB drive.
Step 7: Install DiskGenius.
Step 8: Locate the USB drive in DiskGenius. Delete the EFI folder and replace it with the new EFI folder. Refer to this part of a YouTube video for clarity.
Step 9: Plug the USB drive into the ThinkPad T530 and boot from USB.
Step 10: Format the disk drive to APFS, install macOS Mojave, and restart the system.
Step 11: Connect the Hackintosh system to the Internet via LAN cable, USB tethering or a Mac-compatible external WiFi adapter.
Step 12: Download & install Clover Configurator on MacOS. Open the EFI partition and copy and paste the EFI folder once more.
(Optional) You may use Karabiner-Elements if the keyboard mappings (command and option) are acting up.
All the best!